At Home Magazine, Fall 2002
FROM THIS TO THAT…SIZE DOESN’T MATTER
by Cheryll Gillespie
John Sillaots takes At Home through a small bathroom renovation
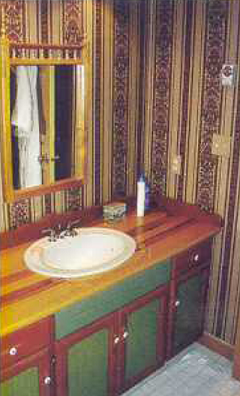
Before: The original bathroom was in definite need of a makeover.
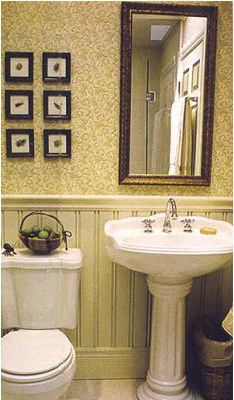
After: The renovated bathroom is bright, efficient and easy to keep clean.
It is a well-known fact that kitchens and bathrooms are the most expensive rooms in a home to renovate, yet keeping these spaces updated and well maintained definitely adds to the value of a home.
Over the past several years, when I have done seminars at consumer trade shows, I have asked both men and women which interior area they look at first when shopping for a home. The majority of men tell me they gravitate towards the basement or the garage while the women seem to target the kitchen and bathroom areas. My wife and I, following along the same lines, knew when we purchased our small country bungalow that the two bathrooms were acceptable but, not too far in the future, both would need to be entirely redone.
We know from experience that it is best to live in a home for at least a year before starting most renovations. This time allows us a chance to get to know the house and find
out which spaces work well and which do not, or how the natural light or shade plays a role in the interior and how the lifestyle change affects our needs. We have time decide what we really miss about our last home and to realize what we can easily live without.
Before we started to renovate our bathrooms we gathered all the information about how our family realistically uses these spaces, to formulate a practical list of our requirements. The first reality is that on one in our family ever lounges in a bathroom. We prefer other rooms for relaxing. Secondly, we have absolutely no problem with only two bathrooms vs. four as in our previous home. Therefore, we would renovate the existing spaces to be bright, efficient and easy to keep clean. We decided the main bathroom needed only a toilet, sink and shower stall, and the ensuite would be the same with the addition of a bathtub. Both bathrooms are situated side by side, taking up a combined space of eight feet by 12 ½ feet. With these set dimensions my wife and I laid out a floor plan that included both bathrooms.
The goal was to move the bathtub from the main bathroom and replace it with a large shower stall. At the same time we would steal three feet and add this additional space to the master bedroom ensuite. We managed to get everything we wanted on paper and were ready to start. For practical purposes we decided to gut and renovate the main bathroom first and leave the ensuite for a future project. The new space was going to be eight feet wide by five feet deep. The toilet and pedestal sink were going to be placed side by side to the right of the centred entrance door and a 44-inch by 36-inch shower stall would be installed on the left side. We were pleased with the small layout except for the fact that this room was the only room in the house that didn't have any natural light or a window that would open. A skylight was the first thing that came to mind, but from all the horror stories we had heard in the past we kept the idea in the back of our minds and put it down only as a possibility.
Remaining undecided on which parts of this renovation we were willing to take on ourselves, it was time to venture out to a few bathroom shops (by the way, they now
call them emporiums). We wanted to see if there was anything new available that might alter our plans, and we wanted to get a few prices on fixtures as well as labour. To tell the truth, we had no clue as to what price range we were looking at.
It was pretty easy to find a suitable toilet, sink and taps. We stayed midrange price-wise. Finding a shower stall of the size we wanted was a problem and was affecting our ability to fulfill our carefully laid plans. Preformed shower stalls come in standard sizes and unfortunately nothing was available to suit our needs. We were told the only alternative was to make a custom unit with tiles. Starting to feel a little apprehensive, we asked to have a quote on both bathrooms.
The salesperson was very accommodating, considering we weren't much help concerning budget. Needless to say, as usual, we were shocked with the $16,000 quote. When we had somewhat recovered we were delivered a further blow when we learned that labour was not included. Talk about destroying the best-laid plans - our renovation was not looking promising.
In hopes of lifting our spirits we went to the nearest box store seeking an alternative. The setup wasn't as pretty, but we managed to find the items we needed and left the store with fixtures for both bathrooms. Going by the emporium's quote we still had about $13,400 left to tackle the shower problem. That should cover it. Things were starting to look a lot better.
Any renovation, whether do-it yourself or not, should look professional upon completion. It is extremely important to be realistic concerning your own do-it-yourself capabilities and to know when to hire a professional in order to attain this goal. I knew that a skylight installation was not a job that I was going to tackle - I had heard too many stories about skylight installations that leaked. Not only was I not going to do the work, I wanted to hire a company with a solid reputation. At a Toronto home show I met a contractor who installed skylights and he confirmed that a lot of his jobs were actually repairs to poor installations. He assured me that a quality skylight, properly installed, would not leak. As a matter of fact his business card says, "Providing leak proof sunshine since 1988." We went ahead with the installation. Sunshine and fresh air now abound in a room that was until recently dark and stuffy. I cannot emphasize enough what a difference this skylight has made to the atmosphere in this small room.
At the same time that the skylight project was under way, I constructed the new wall using metal studs and framed in the shower stall, a job I am comfortable with.
Plumbing is, shall I say was, another task for which I previously hired a professional until a friend brought a solderless plumbing system called PEX- AL- PEX to my attention. It is a bendable aluminum pipe sandwiched between an inner and an outer sleeve of plastic. All the fittings are pressure fitted and make it a snap to use. I had no problem installing the new plumbing and will definitely not shy away from this job in the future.
Pot lights were set in place and the walls were redone in drywall. I made sure to install insulation in the walls to block sound before placing the drywall.
As we were now making our own custom-tiled shower stall I contacted a company that I had met a while back that sells waterproofing products. I was shown an extensive line of items to make the upcoming tiling job easier, with a professional result. I used a product called Kerdi as a liner for the shower stall, making it waterproof, along with an integrated drain flange which made the shower stall a snap to do. I also used a product called Ditra from the same company as a base for the floor tiles. It is designed as a subfloor that will accommodate movement between the wood subfloor and the tiles, to prevent cracking along the grout lines. These products are readily available, easy to work with and there are good sound reasons to use them.
I used a thin-set mortar to tile the shower walls because adhesives will give out after a while and we certainly don't want to redo the bathroom too soon. This one is going to last a lifetime.
Before I installed the Ditra or the floor tiles, I mortared a NuHeat system in first. NuHeat is like an electric blanket installed under ceramics or stone and, thermostatically controlled, will warm the surface, making it comfortable to stand on. Costing about the same as a light bulb to operate, we had previously decided that if we ever tiled any floor we would install a NuHeat system underneath.
The most important component to ensure a long life for our renovation is an efficient ventilation fan. As a matter of fact I made sure ours was directly wired to the light switch so that when the light comes on, so does the fan. By not removing all the built-up moisture, all kinds of problems can occur. Mould and condensation are the two that are most obvious in a bathroom and with a proper-sized and properly installed ventilation fan placed in the right location, a lot of problems can be eliminated. As an extra, our home is equipped with a "whole-house hepa air-purification system," which controls everything from air pollutants to excess humidity. This system also helps to make life easier for those with asthma or allergies.
To add durability and a country style to our bathroom renovation I installed wainscotting on the walls. I used a product made of medium-density fibreboard (MDF) with a profile called Argyle. This product is manufactured here in Canada and readily available. MDF trim was used to complete the look. These products are easy to use and are great for applying a painted finish.
With the toilet and sink hooked up and all the tiling and grouting done, it was time to order shower doors. Prices were comparable - I looked for good service. This had been a long renovation and it was time to finish it off. I found a company that not only did a fantastic job, they showed up when they said they would and were extremely professional.
The walls were painted and the wallpaper hung. We ordered a custom mirror from our local framing shop that I made into a recessed medicine cabinet for over the sink, and spent a fun few hours shopping for the accessories. Regardless of all the confusion and disruption that the renovation caused, by the time the dust had settled and we stood back and looked at our fresh new bathroom, with the sun shining in, we started looking forward to taking on the next project.

 Are you looking for replace your skylight professionally? Call us at 416-540-4232 or Request a Quote. We are affordable and experienced. Skylight Services.
 For over 33 years we have installed skylights in Toronto, Newmarket, Oshawa and Ajax. Skylight Installation Services.
 If you are looking to repair your skylight in Toronto, Markham, Scarborough and GTA area, simply contact us. Or read about our skylight repair services.
 As the skylight experts in the industry for 33 year we design, manufacture, service and install skylights, sun tunnels and more. Residential Skylights.