Canadian Home Workshop Magazine, October 2001
Natural Beauty
Why limit your windows to the walls? A skylgith project can add lots of light (and a touch of grandeur) to a dark upper-level hallway or ensuite-and with the proper preparation, installing your own is a rewarding do-it-yourself project.
By Karen Kirk
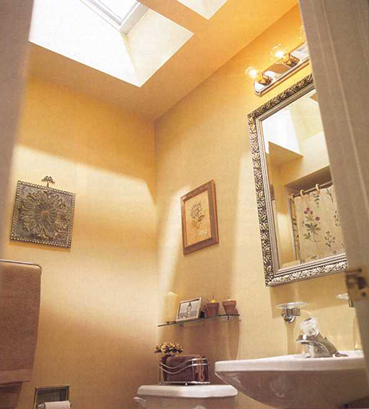
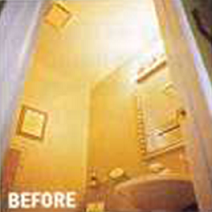
Don’t you sometimes wonder what home builders are thinking when they go to the trouble of adding the convenience of an ensuite bathroom but neglect to add a window for natural light and ventilation? Terry and Estelle Blondin’s master bedroom’s ensuite is a perfect example - a well-used bathroom that’s small, dark, stuffy and uncomfortable. Even a fresh coat of paint and additional lighting couldn’t brighten up their tiny, windowless ensuite. A venting skylight was the perfect solution to improve the air quality and circulation and draw in plenty of natural light (even on a dull day).
The Blondins chose a Velux electric venting skylight with a wood frame and sash that can be painted or stained before or after installation. They decided that two skylights would be better than one. In the small 6 x 7 ceiling there was just enough room to install two skylights side-by-side, creating the dramatic effect of illuminating the entire ensuite with a little light spilling over into the bedroom. The push of a button on the remote control will open or close the skylight quickly, keeping the air fresh and dry.

1. Hammer a nail from the attic to the ceiling to use as a guide; then level, square and mark the ceiling cutout.
2. Making the cut from the inside (using a reciprocating saw) makes catching the drywall cutout easier.
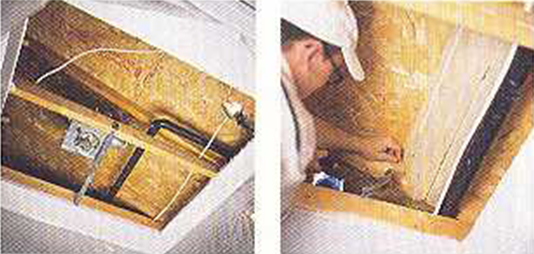
3. Redirect any electrical wiring and plumbing before cutting the hole in the roof for the skylight.
4. Build braces between the rafters for extra support. Hammer a nail up through the roof to mark the roof opening.


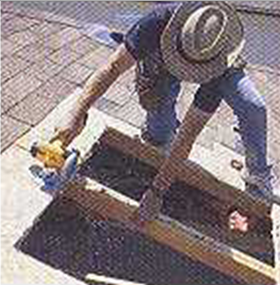
5. On the roof, Charron removes the shingles from the area where they skylights are to be installed using the nail as a guide. The shingles are set aside since some will be reused to finish around the installed skylight once the installation is complete.
6. Cut the skylight opening in the roof deck using a circular saw with the blade set to make the shallow cut.
7. Using the nail as a guide, level, square and mark the opening for the skylight with a chalk line snapped on the roof deck.
8. Fine-tune the skylight openings and trim as required. Install each skylight on either side of the rafter and test for fit.
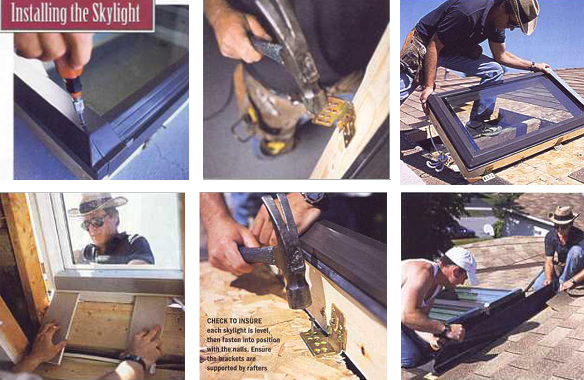
9. Remove the skylight kit from the box and, following the instructions, disassemble the cladding parts from the frame. Remove sides, then top and bottom before installation. Paint or stain the skylights now, prior to final installation.
10. The preinstalled mounting brackets are tapped and locked into position for installation. Location depends on roof material.
11. With Blondin helping from the inside and Charron on the roof, the skylight is test fitted to check for clearances in the opening.
12. In the ensuite Blondin uses scraps of drywall held in position to ensure a proper fit, leaving the appropriate gaps for tolerances.
13. Check to insure each skylight is level, then fasten into position with the nails. Ensure the brackets are supported by rafters.
14. Wrap the skylight frames with a waterproof underlay. The underlay is very sticky and best applied by two people.
Installation Tips
• This is a fair weather project for two or three people-preferably those with no fear of heights. Plan for a full day, and pay attention to the weather reports.
• Roofing projects are best completed the day they’re started. Once you’ve cut the hole there’s no going back!
• Make sure you have all the right tools on hand. You may have to do some plumbing and wiring.
• Charron uses an old piece of carpeting to kneel on when he’s up on the roof. Reuse any joist rafters you may have to cut for braces.
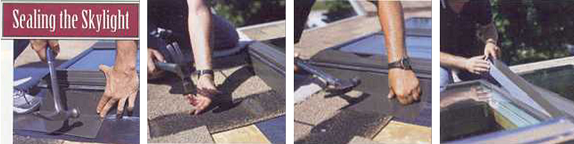
15. Install the step flashing using the 3/4” nails provided.
16. Replace the shingles and nail them into the roof decking.
17. Flashing parts must overlap a minimum of 3 ¼”.
18. Position middle gutter and attach to side frame with nails.
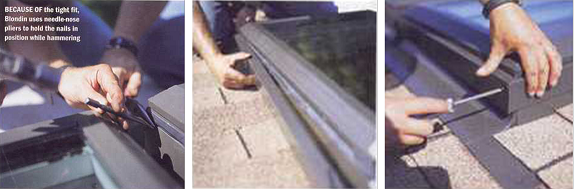
19. Because of the tight fit, Blondin uses needle-nose pliers to hold the nails in position while hammering.
20. Replace frame cladding parts, starting at the bottom of the skylight frame.
21. Make sure top frame cladding is placed in position. Fasten with original screws.
22. Test-fit them first, then position the head flashing sections against the skylight frame.
23. Interlock head flashing sections with the side strip and then hammer to lock.
24. Finally, crimp the head flashing to the side frame cladding.
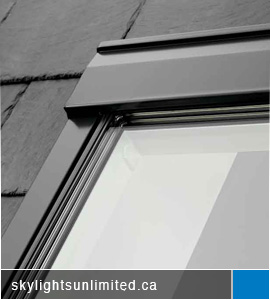
Flashing Systems
Choosing the right flashing or curb for the application ensures a weather-tight and long-lasting installation. There is a flashing system for almost every combination of roof type; shingles or shakes, tile, metal or flat and low-sloped roofs.
Roof curbs are prefabricated to raise the skylight to the concert roof pitch. Special flashing kits are also available for multiple unit installations like the one featured in this project.
Proper Preparation is Key
Installing a skylight is a two-person job and can be completed in a day as long as you’ve done your pre-installation homework like checking for plumbing, wiring and other possible obstacles you may encounter that will affect the location and installation of the skylight. Blondin hired a professional skylight installer, Denis Charron of Skylights Unlimited in Pickering, Ont., to help him get the job done quickly and efficiently. After close inspection of the attic and roof deck where the skylight was to be installed, Charron and Blondin found plumbing and wiring that had to be rerouted and a vent pipe that needed to be moved over a couple of feet before the skylight installation could begin.
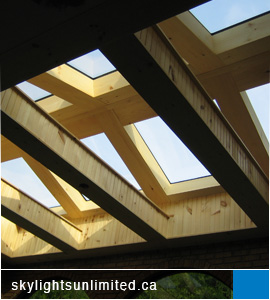
The first job was to mark and cut out the ceiling opening. In this case it was easier to access and work on the plumbing from the bathroom rather than the attic since the space between the ceiling and the roof was tight and it was over 100° in the attic that day. It all took a couple of hours. As it turned out they made up the lost time since no rafters needed to be cut-the skylights could be centred over the bathroom and positioned side by side, fitting between the rafters-and only two new headers were required to reinforce the rafters and support the skylights at the top and bottom.
Ready to Install
With the prep work done they were ready to mark the roof for the opening, remove the necessary shingles within the marked area (saving some to reuse once the skylight was installed), then cut out the opening. Before the skylight was set into position, a simple drywall light tunnel (the passage between the skylight and the ceiling opening where the light travels) was built. After checking for fit and making the appropriate adjustments, the skylight installation was finally underway.
The job is fairly straightforward and can be completed in a couple of days if you prepare the interior site ahead of time and closely follow the instructions that come with the kit. Choosing the right product (and a competent assistant) will make for a successful installation, transforming your rooms into bright and inviting spaces.
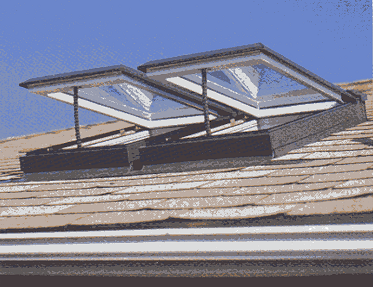
Mission Accomplished: Once the side-by-side installation is complete the venting skylight system is up and running with the push of a button.
Making a Good Fit
Ceiling and roof construction will affect the type of skylight you choose.
• Flat ceilings: a light shaft lets natural light into rooms with flat ceilings and sloped roofs.
• Cathedral ceilings: skylights installed in high sloped ceilings add visual space.
• Sloped walls: a flared light shaft spreads sunlight across the room.
• Flat or sloped roofs: roof curbs (built on site) allow skylight to be installed on a low-sloped or flat roof.
• Roof construction: choose the appropriate size of skylight to suit roofs built with rafters 16” on-centre or trusses 24” on-centre.

 Are you looking for replace your skylight professionally? Call us at 416-540-4232 or Request a Quote. We are affordable and experienced. Skylight Services.
 For over 26 years we have installed skylights in the Oakville, Mississauga, to Toronto, Newmarket, Oshawa and Ajax. Skylight Installation Services.
 If you are looking to repair your skylight in Toronto, Markham, Scarborough and GTA area, simply contact us. Or read about our skylight repair services.
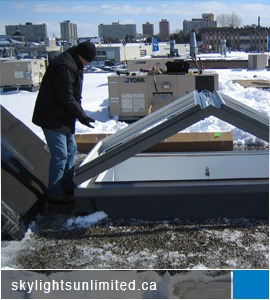 As the skylight experts in the industry for 26 year we design, manufacture, service and install skylights, sun tunnels and more. Residential Skylights.