A Drop of Golden Sun
Few home renovations rival a new skylight for impact. Here’s how to let in the rays
By Allan Britnell
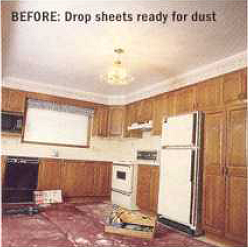

Take one dark kitchen, put holes in the roof and ceiling, add a couple of skylights and volia-it’s a bright new world in Barb Hourtovenko’s home.
And the Lord said, “Let there be light.” Or was that your spouse? For Barb and George Hourtovenko of Hamilton, Ont., the question came from within. They wanted a skylight to help brighten up their kitchen, which received little natural light from a window facing east into a neighbour’s exterior wall. For this job, we spent two days at their home while Denis Charron and Ed Milloy of Toronto-based Skylights Unlimited installed a double skylight over the kitchen. Their tips and the accompanying photos will help you in your DIY installation, but you should always use the instructions that come with the skylight you buy as your main reference guide. You can also ask the skylight dealer for an installation video; some manufacturers make them available for DIYers.
Skylight installation is a two-person job. A lot of the work requires two sets of hands and it’s safer to work with a helper. The job calls for many standard tools, but you’ll also need a few specialty tools. A reciprocating saw is ideal for cutting rafters and drywall. A scaffold will make life easier, not to mention safer. Gloves, dust-mask and goggles will make working in the attic more bearable. You’ll also need a bevel, chalk line and a prybar.
Your first step in a skylight installation is to determine where you want to - and more importantly, where you can - install the skylight. It’s not an exact science. Factors like the placement of beams and rafters, wiring and plumbing and the location of roof vents will influence where your skylight goes. You should also consider installing the skylight on a north or east-facing slope to avoid direct sunlight into the house, which will make it hot in the summer and fade carpets and furniture. For an overview of the types of skylights and accessories you can buy, see page 38.

1. Determine your Layout. You need to start by getting into your attic. After assessing physical limitations around your preferred site, consider interior and exterior esthetics. Once you think you’ve found a good spot, start clearing insulation and laying things out. You may find it easier to work from a piece of plywood laid securely across several joists. Start by laying out the exterior roof opening. You can cut an observation hole in the roof to help you with the layout. Try to place the skylight between existing rafters if you can. Any that are cut will have to be supported while you work. Never cut trusses or more than two rafters without consulting a building engineer first. Once you’ve determined your spot on the exterior roof, do the same on the ceiling. You’ll want to flare the tunnel walls to allow for as much light as possible. “The size of the opening will really depend on what the framing will allow, how deep the tunnel will be and also a bit of common sense,” says Charron. A 2’ x 2’ skylight would be dwarfed in a 8’ x 8’ opening. Two to three times the skylight size is a good standard for the opening. Use a level held against the inside of each end rafter to mark a point on top of the ceiling. Drive a nail in each corner – these will show where the tunnel edges will be on the inside of the house.
2. Run a Chalk Line. Use the nails as guides to run a chalk line along the ceiling.
3. Build a Scaffold. You can work from ladders but it’s much safer and easier to work from a scaffolding – you can make your own like Charron and Milloy did, or you can rent one. Setting up a tarp to keep the insulation and sawdust contained is a good idea. Here Milloy tacks up a tarp from the ceiling to the base of the scaffold. It contains blown insulation and drywall dust and makes clean-up a lot easier.
4. Cut your Opening. Once your scaffold is secure, it’s time to cut the drywall along your chalk line with the reciprocating saw. Make sure all wires in the attic are safely out of the way before you begin. If all goes well it should come down in sheets. “I use a dull blade and keep the cuts very shallow so that I don’t cut any wires or joists,” says Milloy.
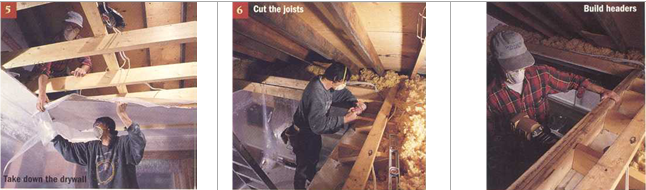
5. Take Down the Drywall. Have your partner up in the attic to make sure your cuts don’t go astray. From there they can also help give some leverage on the drywall once it’s cut.
6. Cut the Joists. Once your ceiling is open you’ll need to cut the joists. Cut them back 3” from the edge of the drywall to allow room for headers.
7. Build Headers. Build doubled-up headers of the same size stock as your joists all the way around the opening.
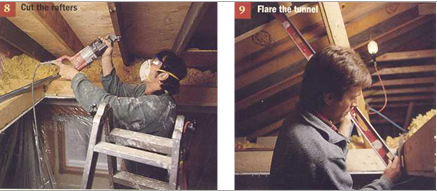
8. Cut the Rafters. Build temporary supports around your rafters before you cut them. “A lot of the wood you remove can be reused for the headers,” says Charron. “In fact, I prefer to use it because it’s already dried up and won’t warp.” Not to mention saving some money and a tree. To support the skylight and cuts to the rafters you need to build a frame of doubled up 2’ x 6’ all the way around your exterior roof as you did on the interior ceiling (see photo 11 for a good view of the new framing). Secure the corners with joist hanger brackets. At this point you can cut out the roof and start installing the skylight or you can work on the tunnel.
9. Flare the Tunnel. If you have a cathedral ceiling you can skip the difficult and time-consuming job of building a tunnel. For those less fortunate, it’s time to hunt down a bevel – a small tool for measuring and transferring angles. “If you take your time and make sure everything is square you’ll save yourself a lot of time in the long run,” says Milloy. The size of your skylight and the opening will determine the angle of your tunnel. Use a level and bevel to determine the angles so you can cut studs for the tunnel walls. Charron suggests that you try to split the angle evenly between the top and bottom walls to make for easier layout and drywalling.

10. Install a Crosspiece. Nail a crosspiece across the length of the tunnel. “We do that so you have an even level for the drywall to taper down from. Otherwise, with two different angles you’ll have to bend the drywall. And that’s a situation the average DIYer doesn’t want to get into,” explains Charron. Toenail studs about 16” apart from this piece into your headers. If you’re thinking of installing lights in the tunnel itself, as the Hourtovenkos did, this is a good time to install the light boxes and run any new wiring that will be needed.
11. Ready to Cut. Weather permitting, it’s time to cut a hole in your roof. From the attic drive a nail up through the roof in a corner of the header. From the roof use this nail to figure out the area of shingles to remove. If it’s in the top right corner, remove shingles below and to the left of it.
12. Remove the Shingles. Timing is a key part of skylight planning. Installing a double skylight – a popular option since you get added light with little extra work required – will take more than a day to finish. You probably don’t want to put a hole in your roof if the skies look overcast. Temperature will play a part too. Don’t remove shingles on an extremely cold day or they will crack. Extreme heat can make working on the roof unbearable. If you’re set, put on your sunscreen and head outside. “There should be a rule that you never go on your roof without having someone with you,” advises Milloy. “It’s good to have someone around if something goes wrong.” Use a prybar or cat’s paw to pop the nails up without damaging the shingles. In order to avoid mismatched shingle colours around your skylight, you’ll need to reuse some of them shortly. Have some spare shingles handy just in case you can’t get any of them off without cracking.
13. Another Chalk Line. Get your partner to drive up more nails from all the inside corners of the window opening (since there were two windows in this case, Charron drove eight nails into the corners). Use these nails as a guide to mark a chalk line for cutting the roof.
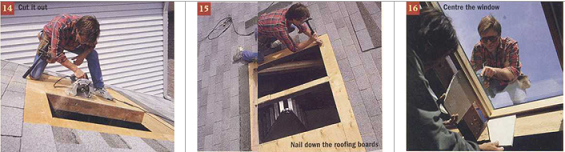
14. Cut it Out. If you’re feeling hardcore, you can cut the opening out from the inside with a reciprocating saw. Otherwise, follow your chalk line with a circular saw. Have your partner positioned below to catch the pieces. Take them inside or throw them off the roof immediately. A gust of wind can easily throw plywood through a window, or it can knock you off the roof.
15. Nail Down the Roofing Boards. Once you’ve cut out the hole for the window some of the sheathing will need to be refastened. Nail the roofing boards around the edge of the opening into your headers. Remember to watch your step, it’s a long way down to the kitchen.
16. Centre the Window. Take the flashing caps off the skylight and then sit it over the opening. With one person outside and the other inside, centre the skylight in the hole. The window Charron and Milloy installed, manufactured by Velux, comes with a channel into which the drywall fits (see “Skylight, Skybright,” page 38). Grab a small scrap of drywall. If you’ve cut your opening to the right size the person on the inside should be able to fit the drywall along the channel on all four sides. Adjust the window so that the drywall will fit evenly into the channel all of the way around the window. When drywalling, you may need to shim the studs to the gyproc.
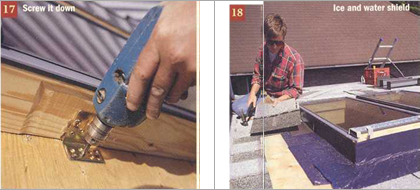
17. Screw it Down. Once the skylight is centred, screw the skylight through the roof sheathing and into the headers using all the hardware provided.
18. Ice and Water Shield. Now you’ll want to install an impermeable ice and water shield all the way around the skylight (see page 38). Start from the bottom and work your way to the top to create an overlapping waterproof barrier. It goes up most of the side of the skylight and under the layer of shingles. “This stuff bonds like crazy. Once the sun hits it, nothing will get it off,” says Charron. For tile roofs or other uneven surfaces, you’ll need to get a flexible lead apron. When you install the flashing, also working from the bottom on up, be sure you nail it into the skylight frame only, and not into the roofing boards. Start with the bottom piece and then work your way up the side with L-shaped step flashing – lay down the flashing, overlap with a shingle and attach another flashing piece. Make sure that you don’t nail through the flashing when reattaching the shingles.
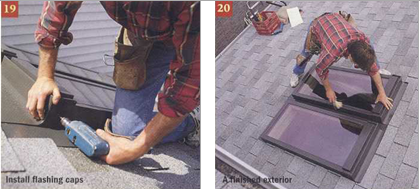
19. Install Flashing Caps. When all the flashing is on, reattach the flashing caps following the manufacturer’s instructions. Use roofing tar (the kind you buy in a caulking tube is easiest to work with) and roofing nails to reattach the shingles.
20. A Finished Exterior. With the skylight in, the water shield down, the flashing and shingles installed, you’ve finished the outdoor part of the job. Let it rain (if it must). Once you’ve cleaned up, it’s time to move back inside for the finishing touches.
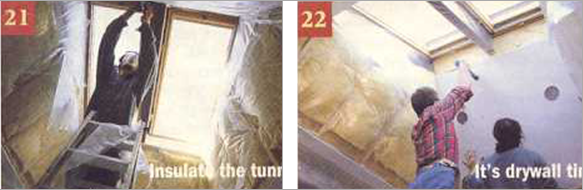
21. Insulate the Tunnel. Proper insulation of the tunnel is key to a successful job. Wearing goggles and gloves, level out any insulation you moved in the ceiling. Use R-20 insulation (it meets code for walls and fits nicely between the studs) and seal it with a vapour barrier.
22. It’s Drywall Time. Drywalling can be a tricky job, especially when you’re dealing with angled walls six feet over your kitchen floor. If you’re owed any favours from your buddy the drywaller, this might be the time to cash them in. (For more information on drywalling, see the February 1992 issue.) Once the tape is dry and sanded, a couple of coats of paint, preferably a light colour to reflect the sunlight, will finish the job off.
When the Hourtovenkos decided to install a skylight in their kitchen, they wanted the most impact for the fewest dollars. They decided against expensive operating skylights (those that can open up), because an existing window provides most of the ventilation. But for extra ventilation up high, they chose a skylight with a small operable rainproof vent. More significantly, they opted for two side-by-side skylights for maximum light. Double skylights are a growing trend: if you’re up there framing anyway, why not put in another one? It doesn’t take much more time, and the chief incremental cost is the extra skylight, which may be as low as $200. “Some people also think single-skylight shafts have a coffin-like appearance,” notes Terry Blondin of Velux-Canada Inc., a Montreal-based skylight distributor.
Skylight prices vary depending on size and whether it’s fixed (i.e., it doesn’t open), operating or has other features like vents. If you’re installing a skylight in the bathroom or other high condensation areas you’ll want, at the very least, a vending skylight. A bare bones 2’ x 4’ fixed skylight costs about $200. The same size skylight that opens can cost $500 or more. If you’ve been planning on adding a room in the attic or above the garage, you might consider roof windows, which are essentially operable skylights within reach. Since they tilt open they can be used as emergency exits. Roof windows start at about $400.
There are other costs to consider. For each skylight you install you’ll need to buy the corresponding flashing kit. These range from $70 or $100. You will also need an additional connector kit for any side-by-side skylight installations.
The ice and water shield is a necessity for skylights that will have to endure Canadian weather. You can buy a package that will be enough to do one window $20, or pick up a 200 sq. ft. roll for $80.
If you have a roof with little or no pitch, you’ll need to install a roof curb that angles the skylight by at least 15° so it will shed water.
As with cars, you can buy a base skylight model, or you can add bells and whistles and drive up the price. You can buy a manually operated rod to open your out-of-arm’s-reach windows for $50, the motorized rod for $200 or skip rods altogether and get the motorized window attachments for $650 or more. If you still have money to burn (and tend to leave windows open when you go out), add a $70 sensor that will close the skylight when it sniffs rain.
Another factor that will affect your final cost is how the skylight is made. Do you go with an acrylic dome-shaped skylight, or do you opt for a sealed unit with low-E glass and argon gas? Low-E is a low emissivity coating that traps heat in the winter and blocks out heat in the summer. Argon is an inert gas that acts as an insulating barrier between the window panes. Low-E and argon gas add to the price, but they are pretty much becoming standard with all windows these days.
And don’t forget the customized blinds at $75 or $400 a set.

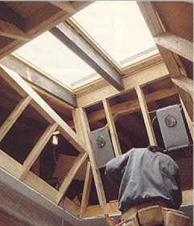
The existing light (photo top left) was removed before the ceiling was cut out for the skylight shaft. The homeowners installed new pot lights in the shaft before the dry wall went up. (right)
Chances are you're going to be taking down a light when you install a skylight. No problem, except when the sun sets at night. To prevent stumbling around in the dark, you'll probably need to install new lights. There are a couple of options. You can install track lights or pot lights around the skylight opening. Or you can do what the Hourtovenkos did and install lights right in the tunnel. Before the drywall goes up it's easy to install pot lights in the tunnel studs. If you've removed a light, you might be able to use the wiring from it. Otherwise, you'll have to install new wiring. When in doubt, hire an expert.
Natural Beauty
Why limit your windows to the walls? A skylgith project can add lots of light (and a touch of grandeur) to a dark upper-level hallway or ensuite-and with the proper preparation, installing your own is a rewarding do-it-yourself project.
By Karen Kirk
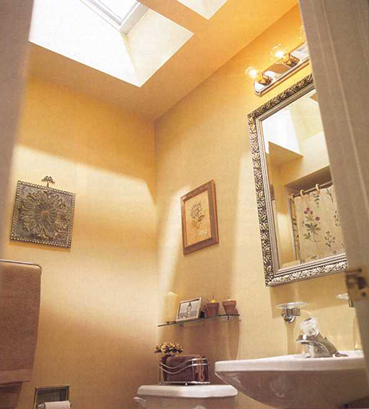
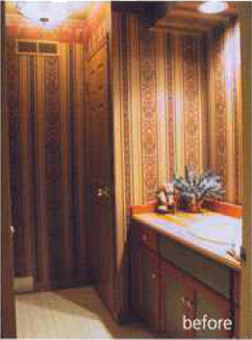
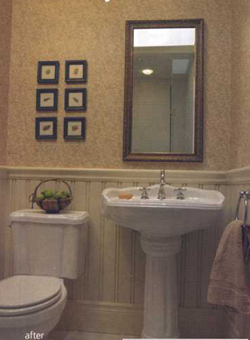
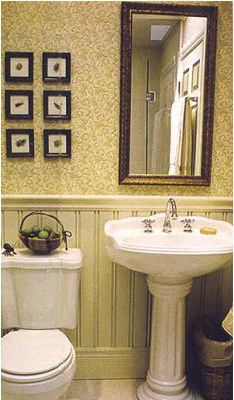
Don’t you sometimes wonder what home builders are thinking when they go to the trouble of adding the convenience of an ensuite bathroom but neglect to add a window for natural light and ventilation? Terry and Estelle Blondin’s master bedroom’s ensuite is a perfect example - a well-used bathroom that’s small, dark, stuffy and uncomfortable. Even a fresh coat of paint and additional lighting couldn’t brighten up their tiny, windowless ensuite. A venting skylight was the perfect solution to improve the air quality and circulation and draw in plenty of natural light (even on a dull day).
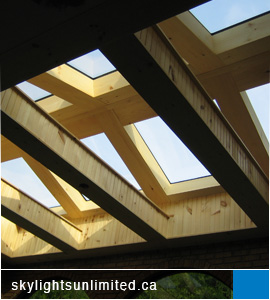
The Blondins chose a Velux electric venting skylight with a wood frame and sash that can be painted or stained before or after installation. They decided that two skylights would be better than one. In the small 6 x 7 ceiling there was just enough room to install two skylights side-by-side, creating the dramatic effect of illuminating the entire ensuite with a little light spilling over into the bedroom. The push of a button on the remote control will open or close the skylight quickly, keeping the air fresh and dry.
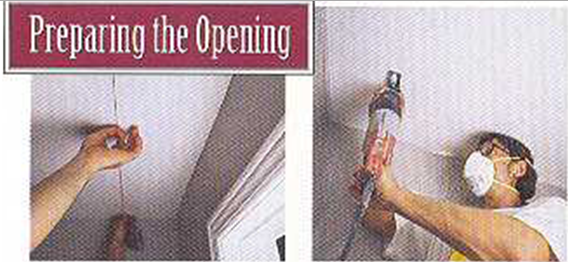
1. Hammer a nail from the attic to the ceiling to use as a guide; then level, square and mark the ceiling cutout.
2. Making the cut from the inside (using a reciprocating saw) makes catching the drywall cutout easier.
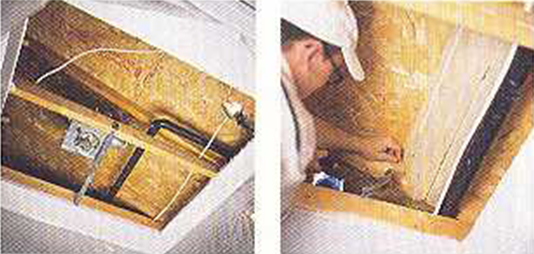
3. Redirect any electrical wiring and plumbing before cutting the hole in the roof for the skylight.
4. Build braces between the rafters for extra support. Hammer a nail up through the roof to mark the roof opening.


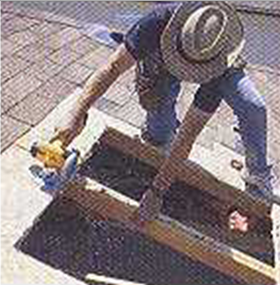
5. On the roof, Charron removes the shingles from the area where they skylights are to be installed using the nail as a guide. The shingles are set aside since some will be reused to finish around the installed skylight once the installation is complete.
6. Cut the skylight opening in the roof deck using a circular saw with the blade set to make the shallow cut.
7. Using the nail as a guide, level, square and mark the opening for the skylight with a chalk line snapped on the roof deck.
8. Fine-tune the skylight openings and trim as required. Install each skylight on either side of the rafter and test for fit.
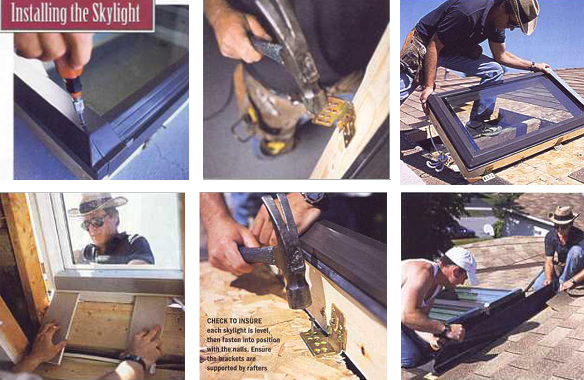
9. Remove the skylight kit from the box and, following the instructions, disassemble the cladding parts from the frame. Remove sides, then top and bottom before installation. Paint or stain the skylights now, prior to final installation.
10. The preinstalled mounting brackets are tapped and locked into position for installation. Location depends on roof material.
11. With Blondin helping from the inside and Charron on the roof, the skylight is test fitted to check for clearances in the opening.
12. In the ensuite Blondin uses scraps of drywall held in position to ensure a proper fit, leaving the appropriate gaps for tolerances.
13. Check to insure each skylight is level, then fasten into position with the nails. Ensure the brackets are supported by rafters.
14. Wrap the skylight frames with a waterproof underlay. The underlay is very sticky and best applied by two people.
Installation Tips
• This is a fair weather project for two or three people-preferably those with no fear of heights. Plan for a full day, and pay attention to the weather reports.
• Roofing projects are best completed the day they’re started. Once you’ve cut the hole there’s no going back!
• Make sure you have all the right tools on hand. You may have to do some plumbing and wiring.
• Charron uses an old piece of carpeting to kneel on when he’s up on the roof. Reuse any joist rafters you may have to cut for braces.
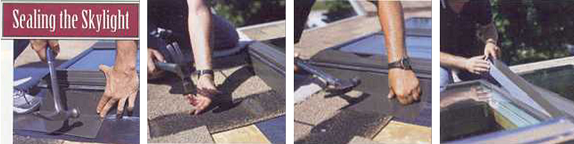
15. Install the step flashing using the 3/4” nails provided.
16. Replace the shingles and nail them into the roof decking.
17. Flashing parts must overlap a minimum of 3 ¼”.
18. Position middle gutter and attach to side frame with nails.
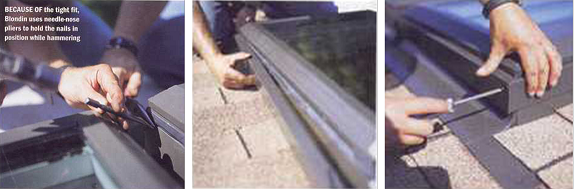
19. Because of the tight fit, Blondin uses needle-nose pliers to hold the nails in position while hammering.
20. Replace frame cladding parts, starting at the bottom of the skylight frame.
21. Make sure top frame cladding is placed in position. Fasten with original screws.
22. Test-fit them first, then position the head flashing sections against the skylight frame.
23. Interlock head flashing sections with the side strip and then hammer to lock.
24. Finally, crimp the head flashing to the side frame cladding.
Flashing Systems
Choosing the right flashing or curb for the application ensures a weather-tight and long-lasting installation. There is a flashing system for almost every combination of roof type; shingles or shakes, tile, metal or flat and low-sloped roofs.
Roof curbs are prefabricated to raise the skylight to the concert roof pitch. Special flashing kits are also available for multiple unit installations like the one featured in this project.
Proper Preparation is Key
Installing a skylight is a two-person job and can be completed in a day as long as you’ve done your pre-installation homework like checking for plumbing, wiring and other possible obstacles you may encounter that will affect the location and installation of the skylight. Blondin hired a professional skylight installer, Denis Charron of Skylights Unlimited in Pickering, Ont., to help him get the job done quickly and efficiently. After close inspection of the attic and roof deck where the skylight was to be installed, Charron and Blondin found plumbing and wiring that had to be rerouted and a vent pipe that needed to be moved over a couple of feet before the skylight installation could begin.
The first job was to mark and cut out the ceiling opening. In this case it was easier to access and work on the plumbing from the bathroom rather than the attic since the space between the ceiling and the roof was tight and it was over 100° in the attic that day. It all took a couple of hours. As it turned out they made up the lost time since no rafters needed to be cut-the skylights could be centred over the bathroom and positioned side by side, fitting between the rafters-and only two new headers were required to reinforce the rafters and support the skylights at the top and bottom.
Ready to Install
With the prep work done they were ready to mark the roof for the opening, remove the necessary shingles within the marked area (saving some to reuse once the skylight was installed), then cut out the opening. Before the skylight was set into position, a simple drywall light tunnel (the passage between the skylight and the ceiling opening where the light travels) was built. After checking for fit and making the appropriate adjustments, the skylight installation was finally underway.
The job is fairly straightforward and can be completed in a couple of days if you prepare the interior site ahead of time and closely follow the instructions that come with the kit. Choosing the right product (and a competent assistant) will make for a successful installation, transforming your rooms into bright and inviting spaces.
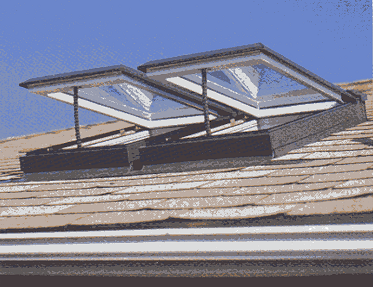
Mission Accomplished: Once the side-by-side installation is complete the venting skylight system is up and running with the push of a button.
Making a Good Fit
Ceiling and roof construction will affect the type of skylight you choose.
• Flat ceilings: a light shaft lets natural light into rooms with flat ceilings and sloped roofs.
• Cathedral ceilings: skylights installed in high sloped ceilings add visual space.
• Sloped walls: a flared light shaft spreads sunlight across the room.
• Flat or sloped roofs: roof curbs (built on site) allow skylight to be installed on a low-sloped or flat roof.
• Roof construction: choose the appropriate size of skylight to suit roofs built with rafters 16” on-centre or trusses 24” on-centre.
 Here’s a renovation with a difference. John Sillaots, the popular host of HGTV’s In the Workshop, made this bathroom brighter, more practical and, contrary to what most people might expect, significantly smaller.

 Are you looking for replace your skylight professionally? Call us at 416-540-4232 or Request a Quote. We are affordable and experienced. Skylight Services.
 For over 33 years we have installed skylights in Toronto, Newmarket, Oshawa and Ajax. Skylight Installation Services.
 If you are looking to repair your skylight in Toronto, Markham, Scarborough and GTA area, simply contact us. Or read about our skylight repair services.
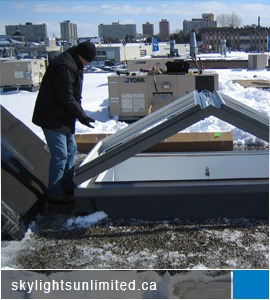 As the skylight experts in the industry for 33 year we design, manufacture, service and install skylights, sun tunnels and more. Residential Skylights.